Table of contents
- The Basics
- Document structure
- Text formatting
- Semantics
- Links
- Special characters
- Images
- Lists
- Tables
- Framesets
- Forms
- Image maps
The Basics
This is not intended to teach you everything there is to know. My hope is that after reading this, you will be able to use these examples to put together HTML formatted documents of your own.
This tutorial is based on on the W3C recommendation, where the idea is to use CSS wherever possible, but to still include semantic HTML to support older browsers. I have also written a CSS tutorial to demonstrate its use.
HTML is a markup language, and is by far the most commonly used language on the Web. Markup languages give structure to a document. They say what parts are headings, what parts are paragraphs, what parts are bullet lists, etc.
The W3C HTML 4.0.1 specification is available if you need to check on what elements are available and what attributes they support.
Tags or elements are on/off switches for different types of formatting. Unless otherwise specified, every "on"
tag (such as <head>) needs a closing ("off") tag at its end (</head>).
Wherever possible, include the closing tags, even if they are not essential, as this makes it easier for you to follow
your own markup, and makes it easier to read.
Whilst many tags can be 'on' at any one time, under no circumstances should tags overlap. For example, this is invalid:
<p><strong>strong text <em>strong and emphasised text</strong> just emphasised text</em></p>This version is valid:
<p><strong>strong text <em>strong and emphasised text</em></strong> <em>just emphasised text</em></p>This is one of the reasons you will frequently see designers indent html, as it makes it easy to check which closing tag relates to which tag. For example, this is clearly wrong:
<p>
  <strong>
    strong text
    <em>
      strong and emphasised text
  </strong>
    just emphasised text
    </em>
</p>
However, this is valid:
<p>
  <strong>
    strong text
    <em>
      strong and emphasised text
    </em>
  </strong>
  <em>
    just emphasised text
  </em>
</p>
Note here that none of the indents will show up in the html. If we look at the valid version of that last line, when displayed it will look like this:
strong text strong and emphasised text just emphasised text
The reason for this is that in HTML, there is never more than one space between words or characters, reguardless of
line breaks, extra spaces or tab characters in the source code. The only way to make more than one space is to use the
'non breaking space' entity (see the section on special characters), set the HTML to be preformatted
using <pre> tags, or use CSS to style the text so that whitespace is respected.
Tags, elements, and attributes
We have already seen what a tag is, and that there are opening and (in most cases) closing tags. The browser will read these tags, and it will internally create a representation of what you gave it. This internal representation is known as an element. It will then work out how to display the element on the screen. Not all elements are displayed (such as the HEAD element), and some elements will always exist, even if you do not create the tags for them (such as the HTML, HEAD, or BODY elements). These elements are most obvious through scripts or CSS, but for now, just trust me, they are there.
Some elements accept extra parameters. For example, the A element can accept the HREF parameter, which converts it into a link. These parameters are known as attributes, and are created like this:
<a href="somefile.html">Although it is possible to specify some attributes without quotes (depending on the value they hold), I advise you to always include them, as it makes the document easier to maintain, and will help to avoid mistakes later.
Attributes are separated by spaces or linebreaks. Some attributes do not expect a value, and are written just as the name of the attribute, without any equals sign, or quotes:
<select id="oselect"
  name="somechoice" multiple>
Note that in HTML, tags and attribute names can be written in any case. Some authors like to use upper case to make them stand out from their contents, and some like to use lower case to make them easier to translate to XHTML later if needed. It is perfectly OK to use whichever makes the most sense or is the most useful to you.
Document structure
Before we can start on the document itself, we have to tell the browser what version of HTML we will be using. The current HTML version is HTML 4.01, so that is what I will concentrate on in this tutorial (note that for those of you who want to use XHTML, I will not cover that, however XHTML 1.0 maps directly to the elements available in HTML 4.01).
There are three versions of HTML 4.01, and they each have their own purposes. You should choose the one that is most appropriate for your uses. In this tutorial, I will concentrate on the strict version, and give notes about the others where needed.
- Strict
- The cleanest and simplest version of HTML. It allows you to use only the parts of HTML that relate to structure, and in general, does not allow you to use parts that relate to styling (since HTML can perform some basic styling, but this has been replaced by CSS).
- Transitional
- This is the messy version. It allows you to use several styling tags and attributes, that really have no place in HTML, but were originally introduced before CSS existed. In general, it is best to keep the markup and styling separate (that makes it easier to change styles later, and to share the same style on multiple pages), but you will need this HTML version if you start using framesets. Elements and attributes that are only available in transitional HTML (with the exceptions of IFRAME and TARGET) are referred to as deprecated, and you are advised not to use them.
- Frameset
- This allows you to use a frameset instead of a body, so you can combine multiple pages into one.
In practice, browsers generally allow you to use any HTML no matter what HTML type you use, but note that this is not a recommended way to write pages. You can even omit the HTML version declaration. However, a browser would be within its rights to ignore anything that is not in the specified version of HTML. Browsers are very forgiving. They are designed to cope with a large number of mistakes, but there is no standard for how to do this. Each browser tries its best to deal with as many mistakes as possible, but they may each take a different approach to dealing with these mistakes. The best way to write your code is to declare the correct type of HTML you will be using, not to make mistakes, and not to rely on the browser to understand how to fix your mistakes.
If you do not define these document types correctly, then most browsers will treat your document as having problems. They will start making deliberate mistakes (mainly to replicate the bugs of certain older browsers). These deliberate mistakes are known as quirks, and will change the behaviour of CSS and JavaScript. It is very important that you define the document types as I will show you here, so that you get a reliable response in all current browsers.
The way we tell the browser what version of HTML we will be using is with the DOCTYPE declaration. This should be the first thing in the HTML file. The three doctypes for the three HTML 4.01 versions are:
- Strict
<!DOCTYPE HTML PUBLIC "-//W3C//DTD HTML 4.01//EN" "http://www.w3.org/TR/html4/strict.dtd">- Transitional
<!DOCTYPE HTML PUBLIC "-//W3C//DTD HTML 4.01 Transitional//EN" "http://www.w3.org/TR/html4/loose.dtd">- Frameset
<!DOCTYPE HTML PUBLIC "-//W3C//DTD HTML 4.01 Frameset//EN" "http://www.w3.org/TR/html4/frameset.dtd">
Example Structure
Each HTML page should consist of two sections:
- The head, where information about the page is held, such as the title, a short description and keywords. It may also contain stylesheet information and script libraries.
- The body, where the text or images that the user is going to see are held.
The following tags are used to build the basic structure (note that the tags for HTML, HEAD, and BODY are optional, but as I have already said, it is a good idea to include them anyway, as it helps you to keep track of where things are in your document):
<html>- Signifies the start (and end) of the document.
<head>- Signifies the start (and end) of the head section of the document.
<title>- The title of the document. This is displayed by most browsers in the window title bar, the tab, and the taskbar button. Search engines will usually use it as the title for search results. It is also used by most browsers as a bookmark title, so try to keep it short and concise.
<body>- Signifies the start (and end) of the visible contents of the document - this is where the parts you want the user to see should go.
- BODY contents
- The part you want the user to see - according to the specification, this must contain at least one block element, such as a heading, paragraph, table, or bullet list. All contents of the body must be inside a block level (or equivalent) element. Text content and inline elements must not be put directly into the body.
A complete example of a HTML document would be:
<!DOCTYPE HTML PUBLIC "-//W3C//DTD HTML 4.01//EN" "http://www.w3.org/TR/html4/strict.dtd">
<html>
  <head>
    <title>Hello world example</title>
  </head>
  <body>
    <p>Hello World!</p>
  </body>
</html>
Text formatting
Block level elements
A block level element is something like a paragraph or heading. Typically, when browsers display them, they are shown with gaps above and below them to separate them from other elements. There are a few main block level elements that are of main interest at this stage. These are the headings, paragraph, preformatted text, and generic div elements. Browsers will have a default way of displaying these, so that even if there is no styling information, readers can still make sense out of the information.
Unless otherwise stated, these block level elements can only contain inline elements or text. They cannot contain other block elements.
<h1>- Generally this serves as the main heading on the page. It is often the same as the title, but it does not have to be. Normally, this would be the first element inside the BODY.
<h2>-<h6>- These are sub headings. You should step through these in sequence. If you need to give subheadings to anything after the main heading, then you should use H2. If you need to create subsections within these sections, they should use H3, etc.
<p>- This denotes a paragraph, just like a normal paragraph in a document. In theory you can omit the closing tag, but I advise you to always include it.
<pre>- This denotes a block of preformatted text. In general you should avoid this, but it can be useful for a few things, such as displaying a block of source code, or displaying a verse of a poem. Inside a PRE block, all spaces, tabs and linebreaks are preserved, and will be displayed on the page.
<address>- This denotes a special type of paragraph that contains contact information, such as a postal or email address.
<blockquote>- This is for use when quoting text from other pages, books, documents, speeches, etc. It cannot contain text directly, and should instead contain other block level elements. They can then contain the quoted text. It is also possible to use the cite attribute to give the URL of a page where the quote was taken from, but no current browsers have a useful way to use that.
<div>- This is a generic block element, and it can contain text directly, or it can contain other block elements. In pure HTML, it serves no purpose. The reason it exists is mainly to facilitate styling, or to allow you to denote arbitrary blocks of content, to give meaning where there is nothing more appropriate. For example, there is no footer element in HTML, but you may still want to create a footer for your document. If you cannot find a more appropriate element for what you want to put in your footer, you can create a DIV and use either the ID or CLASS attributes to give it an identifier of your choice. You can then use that identifier to denote a footer, which you can then style with CSS.
<hr>- Displays a horizontal rule between two blocks. Note that if you need to display horizontal rules, there are usually better ways, such as using CSS to apply a border to an element. The HR element itself has no real meaning in HTML.
Inline elements
Inline elements are fragments of the contents of a block level element. For example, a piece of emphasised text inside a sentence. HTML has a large number of these inline elements, and they each serve a specific purpose. Browsers may apply default styles to these elements, such as displaying a line through deteted text, and using italics for definition text. There is no strict rule as to how these should be rendered, and most users will be used to the response of their browser. If you need a specific response, use CSS to style the elements however you need.
Inline elements can contain other inline elements as long as they are correctly nested.
<em>- Indicates emphasised text - most browsers render this in italics.
<p>This is an <em>important</em> word.</p> <strong>- Indicates strongly emphasised text - most browsers render this in bold.
<li>This is <strong>very important</strong>.</li> <sub>- Indicates subscript text - most browsers render this in a small font, positioned near the bottom of normal text.
<h3>Oxygen is O<sub>2</sub></h3> <sup>- Indicates superscript text - most browsers render this in a small font, positioned near the top of normal text.
<p>This is the 2<sup>nd</sup> street.</p> <code>- Used for a short piece of programming code that is used as part of a sentence - most browsers render this in a monospace font.
<dd>This is done using the <code>x++</code> operator.</dd> <samp>- Used for a sample output from a program, script, or form - most browsers render this in a monospace font.
<p>This script would output <samp>Hello world</samp></p> <kbd>- Used to indicate a key combination or keyboard shortcut - most browsers render this in a monospace font.
<td>Press <kbd>Ctrl+C</kbd> to copy</td> <var>- Used to indicate a program or code variable - most browsers render this in italics.
<li>Here, we can use the <var>window.document</var> object</li> <dfn>- Used to indicate that the word(s) inside the DFN element are being defined in the current paragraph (or whatever the parent block element is) - most browsers render this in italics.
<p>A <dfn>heading</dfn> is a title for a section of a document.</p> <ins>- Indicates that the inserted text has been inserted into the document after its initial creation - generally used along with the DATETIME attribute to say when the change occurred.
It is also possible to use the cite attribute to give the URL of a page with more details about the change, but no
current browsers have a useful way to use that. Most browsers render this with an underline or in italics. The
underline can make it easy to confuse with links, but most browser have still adopted the underline convention.
<p>This is <ins datetime="2006-02-22T17:43:32GMT">not</ins> the only time this has happened.</p> <del>- Indicates that the inserted text has been deleted - generally used along with the DATETIME attribute to say when the change occurred - most browsers render this with a line through it.
<p>There are <del datetime="2006-02-22T17:43:32GMT">loads of</del> options.</p> <abbr>and<acronym>- Used to indicate that the word or letters are a contracted form of more words. There is a lot of confusion over
where each of these should be used, but in general, the ABBR indicates that the letters are not spoken as a word
(such as HTTP), whereas ACRONYM indicates that the contents are
spoken as a word (such as such as laser).
Future HTML versions will only have the ABBR element, so you may want to avoid the ACRONYM element
altogether, and use only the ABBR element for all abbreviations and acronyms.
The title attribute is used to give the full expanded form of the abbreviated word. Most browsers display this with a
dotted bottom border. Internet Explorer 6- does not recognise either of these elements. Internet Explorer 7+ recognises
both, but does not apply any styles to them by default.
<dd>This uses the <abbr title="HyperText Transfer Protocol">HTTP</abbr> protocol.</dd> <q>- This is for use when quoting text from other pages, books, documents, speeches, etc. In some browsers it will
automatically be given quotes at each end.
It is also possible to use the cite attribute to give the URL of a page where the quote was taken from, but no
current browsers have a useful way to use that.
<p>According to him <q cite="http://example.com/">there is no spoon</q>.</p> <cite>- Used to give the title of a cited source - most browsers render this in italics.
<li>More information can be found in <cite>A Tale of Two Cities</cite>.</li> <span>- This is a generic inline element. In pure HTML, it serves no purpose. The reason it exists is mainly to facilitate
styling, or to allow you to denote arbitrary inline content, to give meaning where there is nothing more appropriate.
For example, you may want to show how to work through a menu to find the desired option. Since there is no menu path
element in HTML, you could use a span, give it an appropriate CLASS or ID that you can use as
an identifier, then use that identifier to style it in the CSS.
<li>Open the options dialog using <span class="menu">Tools - Options</span>.</li> <br>- Inserts a line break into text, and does not have a closing tag. This should be avoided in most cases. There are very few cases where this is the
right thing to use. The only places where it should be used are where the parent element has no other means of
formatting but the contents require line breaks, such as a postal address inside an address element.
<address>22 Example Street<br>Exampletown</address> <b>,<i>,<big>,<small>,<tt>- These elements make text bold, italic, big, small, and fixed width font respectively. HTML transitional also allows a few others such as STRIKE or S (line-through), U (underline), and FONT (font families and colours). I recommend that you avoid these, mainly because there is almost always something much more appropriate.
Semantics
Semantics simply means trying to make sure your documents mean something, even if CSS is not available, even if your document is being displayed on a device that does not use the same default styles as you expected, or if it is being interpretted through a non-visual medium, such as braille or speech.
The idea is simple. Use the right elements for the right tasks. Browsers understand what those elements mean, and they can use many different techniques to convey that meaning to the user. But that only works if you use the elements the way they were meant to be used.
For example, the DFN element is usually shown in italics. Assume that you want to display italics text, to emphasise it. You could use the DFN element. But that makes no sense, since you are not defining anything. You are emphasizing it. You could also use the I element, since that will always display in italics (assuming the browser can display italics). However, this means nothing. It does not emphasise the text. It just displays it in italics. What you want to do is to emphasize the text, so use the EM element, that is what it is there for. Most browsers already display this in italics, but just to make sure, you can include this in your stylesheet:
em { font-style: italic; }By using the right elements, you have the benefit that without CSS, the browser will display it emphasised in some way. Some text based browsers may use bold or underline, speech browsers may say that part with a little more stress or volume, but in all cases, the browser can use that information to tell the user that the text is emphasised.
So you can see how using the right elements in a sentence is a useful approach. But it does not end there. It is equally important to use the right levels of headings in the right places, and not to use other elements to replace headings. If you use proper headings, some browsers will even allow users to jump from heading to heading. This is only possible if you actually use proper headings.
The biggest offender when it comes to semantics is the table. I will cover these later, but just accept that tables have a purpose. That is to display tabular data. Unfortunately, due to poor support for styling by some old browsers, tables were often abused to format the page, putting parts of their contents into columns, or specific arrangements. It is common to find pages made out of multiple tables nested inside each other, forcing the page into whatever shape the author desired. Tables were never meant to do this, but to a large extent, they filled a void before CSS was supported well enough to use properly. In fact, in some cases, Internet Explorer 7- still forces tables to be abused to do this. To make a proper semantic page, use tables only for tabular data. They denote a table structure, nothing else. If you want to position parts of your page in strategic places, use CSS, that is what it is there for.
As a final example, try the common navigation used on a page. Typically, pages will have a list of links, and these are often displayed at the top of the page, or to one side of the main content. There are many ways to produce a series of links, but some are much better than others. The list of links is basically just that, a list. So use a list. Give it a heading (such as "Navigation") and then use a bullet or ordered list.
There is no single rule for how to make a semantic document, but just remember that HTML has a lot of element types available, and whenever you think that you would like to make a part of the document look or behave in a certain way, take a look at the list of available elements, and use the one that suits the purpose for what that part of the page represents. If you want to make it look a specific way, style it with CSS, and leave the HTML free to denote what the parts of the page represent, instead of how they should look.
Another factor when making a semantic document is making sure the order of the document makes sense. For example, you should make sure the navigation and main content is sensibly ordered (typically with the navigation either first or last - CSS can then display this wherever you want). Try to keep the markup clear from clutter. Adding in several unrelated blocks (often for advertising) in places where the user would not expect it can cause problems, so try to make sure that the flow of the document still makes sense. The following is a typical example:
<!DOCTYPE HTML PUBLIC "-//W3C//DTD HTML 4.01//EN" "http://www.w3.org/TR/html4/strict.dtd">
<html>
  <head>
    <title>My document</title>
  </head>
  <body>
    <h1>My document</h1>
    <h2>Section 1</h2>
      <p>Some text about the current subject.</p>
      <h3>Section 1.1</h3>
        <p>Some more text about the current subject.</p>
        <p>Yet more text about the current subject.</p>
        <blockquote><p>Some quoted text</p></blockquote>
    <h2>Section 2</h2>
      <p>Some introduction to the data table.</p>
      <table>
        ...contents omited for clarity...
      </table>
    <h2>Navigation</h2>
      <ul>
        <li><a href="/">Home</a></li>
        <li><a href="/articles">Other articles</a></li>
      </ul>
  </body>
</html>
Links
HTML pages link to each other using the A element with the HREF attribute set:
<a href="otherpage.html">Link text</a>The A element is an inline element, and must not contain block elements. All links require a closing tag.
There are several ways to define the HREF of the link, so that you can link to other files in the same directory, files in parent or child directories, files on other Web sites, email addresses, and several other things as well.
If the href starts with a protocol (such as http:, https:, mailto:,
ftp: or file:), then the link will be absolute, and will need to include the full server and
path information. If it does not start with a protocol, it will be relative to the current file, and will need to use the
path format to make it jump up and down directories as needed.
Full HREFs are usually specified in the following format:
http://domain_name/directory_name/sub_directory_name/file_name.file_extensionRelative HREFs depend on many things, but there are a few simple formats:
foo.html- Go to the file called foo.html in the current directory
../- Go back up one directory
somename/- Go forward to the somename directory
./- Go to the root of the current directory (most servers will serve the index.html file in the current directory)
/- Go to the root of the current Web site
/somepath- Go to the root of the current Web site, then follow the path
#identifier- Scroll the page to the element with the ID "identifier" or the A element with the name attribute set to "identifier" - this is known as an anchor
Some of these can be combined, as with the following example, where the link points to a page two directories up, into the directory called foo, then the file called bar.html, where it will scroll to the internal anchor called baz:
<a href="../../foo/bar.html#baz">The following set of examples show what various HREFs would link to:
http://www.example.com/foo.html- Links to "http://www.example.com/foo.html"
file://localhost/c:/foo.html- Links to "c:\foo.html" (for security reasons, some browsers will not allow online Web pages to link to files on the user's computer)
foo.html- Links to "foo.html" in the same directory as the current page
#sublinknumber1- Scroll to the anchor in the current page called sublinknumber1
foo.html#sublinknumber1- Go to "foo.html" and scroll to the internal anchor called sublinknumber1
mailto:jon@example.com- Use the mail client the user has defined to start an email to "jon@example.com"
Special characters
Since HTML itself uses certain characters for its markup, those characters cannot be used on a page, or the browser will think they are part of the markup, and will not display them the way you want. But HTML has to make it possible to display these characters. In order to do this, it uses entities. Entities are written in the following format:
&name_or_numeric_code;In fact, it is possible to write all characters in entity format, including those not supported by the encoding used by your server. These are the most important entity characters, and you should use them whenever you want to display the relevant characters, either inside the normal page content, or inside the atttributes of HTML elements:
The <code title="The > means "greater than"">></code> characterThe most important characters are these:
- &
- A & character
- <
- A < character
- >
- A > character
- "
- A " character
-
- This is a space when you want more than one space between things
There are more. See the Web Design Group pages for more details or view my entity summary.
My entity summary page includes extended characters, and browser compatibility information (for 5th generation browsers).
HTML allows you do do several things to exceed the limitations of basic text. As well as allowing you to write entity
characters that you would not normally be able to write, HTML allows you to add comments into your pages to remind
yourself what you were doing, and what that part of the page represents. The browser will ignore them, and will act
like they are not even there. These are defined
as below, and to keep things easy and reliable, never include '--' anywhere inside your comment.
<!-- Comments go in here -->For a more detailed look at comments, see my HTML and SGML comments article.
Images
There are three types of images that are usually used on the Web; JPEGs, GIFs and PNGs. Some browsers cannot handle alpha transparency in PNG images.
Images are embedded in Web pages using the IMG element. This allows you to specify the source of the image, and alternative text to use if the image cannot be displayed. It is also possible to specify its width and its height, but generally this is not needed, since images will be displayed at their natural size anyway. If you want to display an image at anything other than its natural size, you can use CSS to manipulate its height and width. Most browsers will also display a border on the image if it is inside a link. If you do not want this, then remove it with CSS.
Images are an inline element and can be inserted anywhere inside the normal flow of a paragraph, or other text content.
<img src="some_image.jpg" alt="Alternative text here">The ALT attribute is required. There is no closing tag.
Choosing good alternative text
The alt text should be used to ensure that the document still makes sense without the image being displayed.
If you have text on the image, the alt text should match the text
or say something relevant. If the image is a link, you should put text that is relevant to the link. If the image is
not important, say for example a red ball that is not a link, then you should not put alt text of "a red ball",
you should put no alt text at all, and instead write alt="".
Basically, imagine that every image is replaced directly with the alt text. Then try reading the page, and see if it all still makes sense.
Some browsers incorrectly use this attribute to produce tooltips. This is incorect behavior. If you want tooltips, use the title attribute:
title="my tooltip"Lists
There are three types of lists:
- Unordered
- These are typically thought of as bullet lists. The items in the list have no specific numeric relationship to each other. Most browsers use bullet points when displaying list items.
- Ordered
- The items in the list have an incremental numeric relationship to each other. Most browsers display numbers beside the list items, and may change this to alternative numberings as lists are nested.
- Definition
- This contains a series of terms and definitions, and would typically be used in a glossary.
The UL, OL and DL elements are block elements. The LI and DD elements they contain may either hold text directly, inline elements, or block elements.
The closing tag is optional for the <li> and <dd> tags, but as always, I recommend you include it anyway.
Unordered lists
The UL element can only contain LI elements directly. It must not contain any other elements unless they are inside the LI elements.
<ul>
  <li> list item 1 </li>
  <li> list item 2 </li>
</ul>
That will produce this output:
- list item 1
- list item 2
Nested lists
It is common to have lists inside lists, allowing you to have several levels of nesting. The nested UL should be put inside one of the LI elements of its parent:
<ul>
  <li> list item 1 </li>
  <li> list item 2
    <ul>
      <li> list item 2.1 </li>
      <li> list item 2.2 </li>
    </ul>
  </li>
</ul>
That will produce this output:
- list item 1
- list item 2
- list item 2.1
- list item 2.2
Ordered lists
The syntax of the ordered list is exactly the same as the unordered list, including the nesting. It is even possible to nest UL and OL lists inside each other.
<ol>
  <li> list item 1 </li>
  <li> list item 2 </li>
</ol>
That will produce this output:
- list item 1
- list item 2
Browsers will have a limit to the number of items they can include in such a list. In general, 10'000'000 is the highest number that can be reliably used in almost all browsers, with Konqueror being the only browser that has a limit lower than that, at just 32'767.
Definition lists
Definition lists consist of a series of terms and definitions. It is also possible to have multiple terms and multiple definitions, if that is appropriate. The terms are given using the DT element, and the definitions are given using the DD element. It is possible (although unusual) to nest definition lists, where the nested list must be inside the DD of the parent list.
The following sample shows a definition list. The first term has only one definition, the second has two definitions, and the third and fourth terms share the same definition.
<dl>
  <dt>Sump</dt>
  <dd>A place where water completely fills the cave passage</dd>
  <dt>Rift</dt>
  <dd>A vertical fracture in the rock, created by geological stress</dd>
  <dd>A passage formed along such a fracture, usually tall and narrow</dd>
  <dt>Abseil</dt>
  <dt>Rappel</dt>
  <dd>To descend a rope using a device to control speed</dd>
</dl>
That will produce this output:
- Sump
- A place where water completely fills the cave passage
- Rift
- A vertical fracture in the rock, created by geological stress
- A passage formed along such a fracture, usually tall and narrow
- Abseil
- Rappel
- To descend a rope using a device to control speed
Tables
Tables in HTML should be used when you need to display tabular data. They are a block level element, and should not be put inside paragraphs. They can be put directly inside the BODY, DIV, LI or DD elements. (They can also be put inside other tables, but I advise against doing that.)
Unlike other block elements, tables do not take up the full width that is available to them (unless you specify a width). Instead, they shrink to fit their contents. As well as shrinking to fit, they can also grow to fit. If you specify a width for the table (using CSS), and the contents force it to be wider, the table will grow to fit the needs of its contents.
Tables are often abused in Web pages to define the structure. Note that this practice is outdated, and can cause problems since it removes the semantic meaning of the tables. If you are thinking of using tables to lay out your page, then you are not using them correctly. Use CSS for layout, in addition, it is easier to setup and change.
Tables offer a large amount of control over their aspects, such as the heights and widths of rows and columns, whether borders should be shown, and what the paddings of each cell should be. I will not cover that here, since that relates to display, and should be done from CSS. There is only one display-related attribute I will cover, and that is because IE 7- does not support the CSS that replicates that attribute's behaviour.
For most tables, the following CSS will produce a normal bordered effect, commonly used when displaying data in tables:
table {
  border: 1px outset gray;
}
td, th {
  border: 1px inset gray;
  padding: 2px;
}
It should also be possible to remove the gaps between the cells using the border-spacing:0px; style on the
TABLE element, but Internet Explorer 7- will not understand that, and requires you to use the
cellspacing="0" attribute on the table element. Alternatively, you can use the
border-collapse:collapse; style. Note that most browsers will also apply the
following rules by default:
th {
  font-weight: bold;
  text-align: center;
}
th, td { vertical-align: middle; }
Empty table cells are not displayed by default in most browsers (so their borders are hidden). To change that, set the
empty-cells:show; style on the TH and TD elements.
A simple data table
Tables are defined a row at a time, using the TR element. Each of these can contain any number of TH (heading) and TD (data) cells. For a table to display correctly, you should have the same number of cells in each row.
<table>
  <tr>
    <th>Heading 1</th>
    <th>Heading 2</th>
  </tr>
  <tr>
    <td>Data 1</td>
    <td>Data 2</td>
  </tr>
</table>
That will produce a table like this:
| Heading 1 | Heading 2 |
|---|---|
| Data 1 | Data 2 |
Using a caption
You can optionally include a caption for your table. If you choose to use this, it must be the first element inside the table. By default, most browsers will display the caption above the table:
<table>
  <caption>Table n. Sample</caption>
  <tr>
    <th>Heading 1</th>
    <th>Heading 2</th>
  </tr>
  <tr>
    <td>Data 1</td>
    <td>Data 2</td>
  </tr>
</table>
That will produce a table like this:
| Heading 1 | Heading 2 |
|---|---|
| Data 1 | Data 2 |
Spanning rows and columns
Cells are permitted to span multiple rows or columns. Typically, this is most useful for headings, but it can be applied to either TH or TD cells. The ROWSPAN and COLSPAN allow a cell to span as many rows or columns as you need. Just make sure that you do not span more rows and columns than are actually available, and make sure that at no point do a rowspan and colspan overlap - this is an error, and browser error handling is not very good at solving that particular problem:
<table>
  <caption>Table n. Sample</caption>
  <tr>
    <th rowspan="2">Heading 1</th>
    <th colspan="2">Heading 2</th>
  </tr>
  <tr>
    <th>Heading 2.1</th>
    <th>Heading 2.2</th>
  </tr>
  <tr>
    <td>Data 1</td>
    <td>Data 2</td>
    <td>Data 3</td>
  </tr>
</table>
That will produce a table like this:
| Heading 1 | Heading 2 | |
|---|---|---|
| Heading 2.1 | Heading 2.2 | |
| Data 1 | Data 2 | Data 3 |
Adding a table head, body, and foot
With more complex tables, it may be necessary to have more than one dimension of headers. In this case, you can use a THEAD element to signify the headers at the top of the table, a TBODY for the normal data, which can also have its own headers, and a TFOOT for a footer. In theory a browser can also detatch the head and foot to keep them usefully positioned when scrolling or printing, but in practice, no browser does this. In theory, you can have multiple TBODY elements, but these are rarely used. If you use a THEAD or TFOOT, these must be written before the TBODY, even though the TFOOT will actually be displayed after it:
<table>
  <caption>Table n. Sample</caption>
  <thead>
    <tr>
      <th>Test</th>
      <th>Result 1</th>
      <th>Result 2</th>
    </tr>
  </thead>
  <tfoot>
    <tr>
      <td></td>
      <td>5</td>
      <td>5.5</td>
    </tr>
  </tfoot>
  <tbody>
    <tr>
      <th>Type 1</th>
      <td>3</td>
      <td>7</td>
    </tr>
    <tr>
      <th>Type 2</th>
      <td>6</td>
      <td>5</td>
    </tr>
  </tbody>
</table>
That will produce a table like this:
| Test | Result 1 | Result 2 |
|---|---|---|
| 5 | 5.5 | |
| Type 1 | 3 | 7 |
| Type 2 | 6 | 5 |
More table features
Tables have a vast array of extra features that can help you make sense out of complicated data tables. I will not cover these here, and instead, I will point you to my article about making accessible tables, where I cover the extra features in detail.
Framesets
Framesets allow you to have more than one page displayed as if they were one page, above each other or beside each other. It is also possible to nest framesets so that some pages are displayed above others, and some are displayed beside others. In addition, pages contained within a frameset can also contain framesets of their own.
Generally, framesets are not a good solution. If all you want to do is to use frames to force your page into a particular layout, then you are using them for the wrong purpose, you should be using CSS. Framesets exist for a very specific purpose. If you have a single page that has the navigation, and you want to keep that page visible at all times, then you can consider using a frameset (although it is much better to put the navigation on every page). With a frameset, you can display the navigation in one frame, and have it open pages inside another frame. The navigation would remain visible no matter what page was being viewed.
Framesets have several problems. They are a general problem for users that cannot view framesets, such as those who use a speech reader, as they make it very difficult to work out exactly what page the user is viewing. They are a problem for normal users because they cannot be bookmarked - users who try to bookmark individual pages only end up with a bookmark for the overall frameset, so the bookmark cannot open the correct page. Then they are also a problem for users who arrive at the linked pages via a search engine, as they cannot get back to the frameset to see the navigation (even if they can reopen the frameset, they usually lose the page they were looking at in the process).
Generally, I advise you not to use framesets. If you choose to use them, make sure that these limitations will not cause problems.
Pages that contain framesets should use the frameset document type declaration as shown on the document structure. Pages within framesets that use the target attribute on links or forms should use the transitional document type declaration.
The frameset element
Framesets are defined using the FRAMESET tag (which also requires a closing tag). This must have the ROWS or COLS attribute specified to say how the frames should be arranged. If you specify rows, the frames will be laid out top to bottom in the order that you define them. If you specify cols, the frames will be laid out left to right. If you specify both rows and cols, the frames will be layed out in a grid from left to right, one row at a time from top to bottom.
The ROWS and COLS attributes expect a comma separated list of frame sizes. The sizes can be
written in a variety of different ways. These are; just numbers (representing the number of pixels), percentages
(representing a percentage of the available space), and the asterisk. The asterisk tells it to use whatever is still
available after laying out the other frames. In addition, you can specify multiplication factors when combined with an
asterisk (such as 2*), so that if more than one frame uses it, they will have the appropriate share of the
available space.
For example, a COLS value of "200,30%,*,2*" would create four columns. Assuming there
is 1000 pixels available; the first column would be 200 pixels wide. The second would be 300 pixels wide. This would
leave 500 pixels free for the remaining columns. The third column will be half the size of the fourth, so the third column
would be 167 pixels wide, and the fourth would be 333 pixels wide.
The FRAMESET element replaces the BODY element from a normal document. In frameset documents, there is no BODY element.
The frame element
Frames are defined using the FRAME tag, which does not have a closing tag. This must have the SRC attribute specified to say what page should be displayed in the the frame. The format of the SRC attribute is exactly the same as a HREF attribute of a link, with the exception that it can only load other pages. It cannot link to anchors within the current page. It can load other pages from the current site, or from other sites.
As well as the frame attribute, there are a few other things that you can specify. By default, users can resize frames to make them larger or smaller. This is a good thing, since their screen may be too small for your layout, and they may need to change the sizes. If you have a specific need to prevent them from doing that, you can set the NORESIZE attribute (this is the type of attribute where you do not have to give it a value, just write the attribute inside the tag).
Most browsers will also show a thin border between frames so that the frames are visually separated. To remove this
border, and make the framed pages display without anything separating them, set the frameborder="0"
attribute on both frames on either side of the border.
The last of the important attributes is the NAME attribute. This is used to set a target that can be used by links and forms inside in pages inside the frames. The name should be a name that makes sense to you, and for the sake of simplicity, try to use just letters and numbers (it can actually contain any characters, but some browsers will display these names when frames are disabled, so it helps if other people can understand them).
It is also possible to use attributes to specify if the frames can be scrolled, or the margins of the body element
in the contained document. However, these are display related, so they should be controlled using CSS (set the
overflow:hidden; style, and the margin and padding on the HTML and BODY elements).
It is very important to make sure you provide the correct number of frames according to the number or rows and columns. It is even more important to make sure that no frame loads the parent page, or you will end up with an infinitely nested frameset, and you may cause poorly designed browsers to hang up or crash.
Nested framesets
It is possible to use another frameset tag instead of a frame. This should then contain its own frames within it.
Noframes
To allow you to cater for browsers that do not support frames, or users that are unable to use them, you should always provide a noframes section inside your frameset. This should be placed inside the outermost frameset tag, usually at the end of it. It can contain almost anything that a normal document's BODY can contain.
This is not the place where you tell people to get a better browser. They will already be well aware that their browser does not support frames, and you can be quite sure that they will have their reasons for using what they use. The NOFRAMES element is where you give alternative content. Often this will be a list of links to the pages held inside the frames, or a sitemap giving them links to the pages they may want to visit. You could also use this part of the page to help to give them the overview they are missing without being able to use the frameset.
A complete example
<!DOCTYPE HTML PUBLIC "-//W3C//DTD HTML 4.01 Frameset//EN" "http://www.w3.org/TR/html4/frameset.dtd">
<html>
  <head>
    <title>Database access</title>
  </head>
  <frameset rows="100,*">
    <frame src="header.html" frameborder="0" noresize>
    <frameset cols="100,*">
      <frame src="nav.html" name="navigation" frameborder="0">
      <frame src="main.html" name="mainpage" frameborder="0">
    </frameset>
    <noframes>
      <h1>The Database</h1>
      <p>This gives access to the database contents.</p>
      <ul>
        <li><a href="header.html">Database summary</a></li>
        <li><a href="nav.html">Database sections</a></li>
        <li><a href="main.html">Database overview</a></li>
      </ul>
    </noframes>
  </frameset>
</html>
Opening links in other frames
Pages in a frameset can cause links or forms to open in other pages in the frameset by using the TARGET attribute. The value of the attribute should match the name of the desired frame. Note that in most browsers, a page can only target a frame that comes from the same site. Using the example above, pages in the navigation could use this to target the main frame:
<a href="foo.html" target="mainpage">There are also some extra targets that it can use, even though they are not defined as frame names:
- _parent
- This will load the page in place of the page that is holding the current page in a frameset. This means that the frameset will be removed, and the new page will be loaded instead.
- _top
- This will load the page in place of the topmost page that is holding the current page in a frameset. Even if there are multiple levels of nested frameset pages, they will all be replaced with the new page, so there are no longer any framesets.
Inline frames
There is another type of frame, known as an inline frame. This can be used just like an image, and can be inserted anywhere in the normal flow of text and inline content. To insert an inline frame, use the IFRAME element. This is a little like the FRAME element, in that it uses the SRC attribute to set the location of the page to load. It is also possible to set the WIDTH, HEIGHT, and FRAMEBORDER attributes, but these are usually better done with CSS, setting the width, height, and border styles.
Unlike the FRAME element, the IFRAME has its own fallback content for when inline frames cannot be displayed. The IFRAME has a closing tag, and anything inside the iframe before the closing tag will be used if the inline frame itself cannot be rendered. It can contain anything that is block or inline. Perhaps just some text, or perhaps a list of links to resources. Whatever is appropriate for your purpose.
<iframe src="news.html" name="innerframe">
  <ul>
    <li><a href="news.html">News page</a></li>
    <li><a href="access.html">Accessibility notes</a></li>
  </ul>
</iframe>
Pages that use inline frames should use the transitional document type declaration.
Forms
Forms are used to allow the user to provide information that can be sent to the server. They are also often used as a way for a user to provide information to be used by JavaScripts. To make the most use of forms, you will have to have access to server side scripting, which can process the information. Some hosting services may provide automated scripts that can process the form data and send it as an email.
Different server side scripting implementations deal with these input values in different ways. You will need to check with the documentation of the relevant server side environment to see how to use the submitted values.
Forms are defined using the FORM tag, and there are a few attributes you will need to define. Firstly, you will need to say what method you want the form to use. There are two methods that are used with forms, and your server side environment may place restrictions on which you can use:
- GET
- This is the most common method, and is most useful for smaller forms, where the user will not provide much information.
When they submit the form, it will build a page address that contains all of the form information, encoded as part of
the address:
Because the information is encoded in the URL, it is limited to the length of a URL. In many browsers, this is 4 KB (and due to the encoding, this means about 3 KB of actual form data).http://example.com/foo.php?bar=some+data&baz=test%2B%3D%5Bdata%5D - POST
- This is the smarter method. You will need to use this if any of your inputs are file inputs, or if you might need to be able to handle more than 3 KB of form data. Alternatively, you might want to use this if you need to keep your page addresses clean. Note that if you use this method, your users will not be able to bookmark the resulting page addresses, so I advise you not to use this method for search engines. This method also can cause problems when using back and forward buttons.
The other attribute you will need to specify is the action attribute. This is the location of the page that you want to send the form information to. The syntax is similar to the HREF of a link, except that it should always point to a page, not to any internal links.
<form method="get" action="processform.php">If one of your inputs is a file, you must also set the ENCTYPE attribute to "multipart/form-data". Normally, you do not need to set this attribute, as it will assume its default value of "application/x-www-form-urlencoded".
The FORM element is block level, but it cannot contain inline elements or text directly. It must contain other block level elements, such as paragraphs. These can then contain all the desired form controls.
Is there more?
There is more, but not widely supported. Web Forms 2.0, now included in HTML 5, adds many more input types and abilities. Most notably, it adds number inputs, date inputs, time inputs, slider inputs ('range' - like a volume control), text inputs with auto-completion, output status fields, and others. As well as that, they are self validating, so you can specify the format of the input, and it will require the user to enter valid data. There are also many other features, such as nested forms, multiple file uploads, and ability to automatically repeat sets of inputs.
One of the extra useful features is that older browsers that do not understand the specific type of input will fall back to a basic text input, meaning that you can use the newer input types, and the form will work in browsers that support it, and still function as a basic form in browsers that do not.
Currently, Web Forms 2.0 is supported by Opera 9, and olav.dk has a behaviour file that can be used to add support for Internet Explorer 6+. Safari/Chrome also supports the range input.
Image maps
Note that image maps can cause significant accessibility problems (and can be hard work to maintain), so you should restrict their use to places where they are really appropriate, such as (surprise) a map, where clicking on the parts of the map gives information about the relevant area. If you plan to make an image map out of a list of words just to make your navigation prettier, then you are using them for the wrong reason, and you should use a normal list styled with CSS.
Image maps allow you to make certain areas of an image into links. There are two types of image maps; server side and client side.
Server side image maps
For a server side image map, put an image inside a link, and set the ISMAP attribute on the
IMG (just the name, it does not need a value). When the link is clicked, the browser will request the given
link, and add ?x,y on the end of it, as the click offset from the left,top corner of the image (such as
foo.html?47,8). If the user is not using a mouse (or equivalent), then the coordinates will be 0,0.
<a href="foo.html"><img src="bar.gif" alt="" ismap></a>Client side image maps
- Internet Explorer only understands image maps that use AREA elements, not A elements.
Client side image maps are generally more popular. With a client side image map, you can specify a list of areas that will be used as the links. This gives the user the chance to see immediately if where they are about to click is somewhere useful, as opposed to the server-side image map where they must wait for the reply from the server to tell them. There are four types of these areas; rectangles, circles, polygons and default.
Firstly, you need to create the map that will be associated with the image. This is created using the MAP element, which must have a NAME attribute set, with a name that will be used to reference the map. Images that use the map should have their USEMAP attributes set to the same as the map name, with a '#' character in front of it. The closing tag is required. The MAP is a little strange, since it is an inline element, but it can contain block level contents.
Note; in theory, the map can contain a mix of AREA elements, and block level content. The block level content will always be displayed, even if image maps are supported. Any links within the block level content will be interpreted by the map in the same way as AREA elements, so they can have the AREA and COORDS attributes. This allows you to use part of the normal content as the map areas, hopefully ending up with a more accessible document. Unfortunately, this capability is not well supported, and Internet Explorer in particular does not support it. Since that means that the majority of Web users cannot use these A areas, I recommend you stick with basic areas.
Image maps can be placed anywhere in the document (inside elements where inline content is allowed), and can be before or after the image(s) that use them.
The AREA element should be treated as a block level element, and must be directly inside the MAP element, not inside any of the other block level content inside it. If you intend to use normal block level content inside the map, I recommend you only put it where it makes sense, since it will be rendered, and also only put it inside an element where that sort of content is allowed (such as inside a DIV or LI element). Personally, I think the idea that a map should be inline is wrong, considering the way it is used, but that is what the spec says.
Areas are not rendered visually if image maps are supported. They remain invisible, and only create an area of the map that can be clicked. Browsers that cannot display image maps generally display a list of all the links and areas inside the map. To allow them to display the areas, each AREA needs the ALT attribute set, giving the text that should be displayed as the link content in these browsers. They will usually be displayed in the order that they are defined in the source, so make sure that it makes sense.
Creating areas
- Internet Explorer does not understand the default shape.
- No major browsers understand percentage coordinates correctly, and all interpret percentage coordinates as pixel coordinates.
For now, I will concentrate on the AREA element, but just remember that the SHAPE and COORDS attributes also apply to links inside the map (although again, I recommend that you do not use them).
Firstly, you need to plan what shapes you intend to use, and where they will go. Try to make sure the shapes make sense, and that the user will be able to recognise where those shapes might be on the map. In most browsers, the only way they will know there is an area is that their mouse cursor will change when they hover over it. Image map areas accept almost no styling. The three main shapes are rectangles, circles and polygons. You can use percentages for any of these, but most image maps use exact pixel values, as they work with fixed size images. Firstly create the AREA tag. Use the SHAPE attribute to define the shape; one of "rect", "circle" or "poly". Then use the COORDS attribute to specify the comma separated list of coordinates:
- Rectangle
- This expects four coordinates. The horizontal position of the top-left corner, the vertical position (from the
top of the image) of the top-left corner, the horizontal position of the bottom-right corner and the vertical position
of the bottom-right corner. An example would be:
shape="rect" coords="10,20,75,40" - Circle
- This expects three coordinates. The horizontal position of the centre, the vertical position of the centre
and the radius of the circle (percentage radii are taken as a percentage of the shorter side of the image). An
example would be:
shape="circle" coords="50,80,20" - Polygon
- This expects as many pairs of coordinates as you need to make your polygon. These can make any polygon shapes you
need, and can have sloping lines. All coordinates are specified as horizontal position then vertical position, with all
of them in a long comma separated list. The last pair of coordinates can optionally match the first. An example would
be:
shape="poly" coords="217,305,218,306,218,306,228,316,243,316,243,325,229,325,229,322,217,310"
If any of these areas overlap, the one that is defined first will be used in the places where they overlap. There is also a "default" shape, which covers the entire image, and does not need the coords attribute. However, I advise you not to use this shape, as it makes it impossible for a user to know when they are over a proper area, since the mouse cursor will always show as an area link.
It is possible to use an AREA to puch a hole out of another one. Instead of giving it an HREF attribute, set the NOHREF attribute (without giving it a value). Then make sure that it appears before the other area in the source code, and it will be placed on top of it, as a dead space where the other area will not react.
Remember that every area must have an ALT attribute giving the alternative text to display. For areas with no HREF, it is best to provide an empty ALT attribute. If you use A elements instead, these cannot have an ALT attribute, but browsers can use their contents instead. I also recommend giving every area a TITLE attribute, that most browsers will display as a tooltip when hovering the area. This makes it much more easy to see what the area represents.
An image map example
In this example, I create four areas. One is a rectangle, representing a flag. One is a circle with another circle overlaying it. This creates the doughnut representing a life ring. Lastly there is the polygon representing a beach hut.
<div>
  <map name="beachmap">
    <area href="/" shape="poly" coords="17,51,42,35,66,51,66,89,17,89"
      alt="Beach hut" title="Beach hut - where you get changed">
    <area shape="circle" coords="99,92,12" nohref alt="">
    <area href="/" shape="circle" coords="99,92,23"
      alt="Life ring" title="Life ring - to help you swim">
    <area href="/" shape="rect" coords="129,27,171,52"
      alt="Flag" title="Flag - says if it safe to swim">
  </map>
</div>
<p><img src="../jsexamples/imagemap.png" alt="" usemap="#beachmap"></p>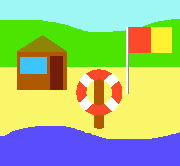
Last modified: 2 January 2012